Portable Multi-Node Cluster
Prerequisites
The only thing you need is a linux machine with Docker 1.10.0 or higher
Overview
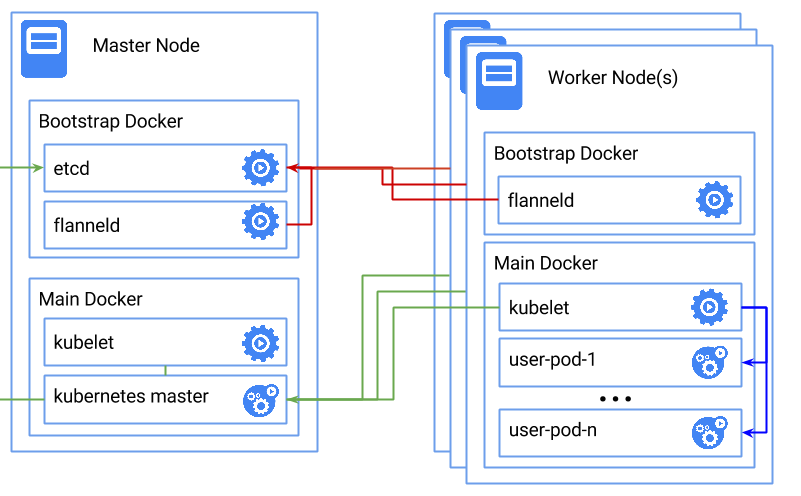
This guide will set up a 2-node Kubernetes cluster, consisting of a master node which hosts the API server and orchestrates work and a worker node which receives work from the master. You can repeat the process of adding worker nodes an arbitrary number of times to create larger clusters.
Here’s a diagram of what the final result will look like:

Bootstrap Docker
This guide uses a pattern of running two instances of the Docker daemon:
1) A bootstrap Docker instance which is used to start etcd and flanneld, on which the Kubernetes components depend
2) A main Docker instance which is used for the Kubernetes infrastructure and user’s scheduled containers
This pattern is necessary because the flannel daemon is responsible for setting up and managing the network that interconnects
all of the Docker containers created by Kubernetes. To achieve this, it must run outside of the main Docker daemon. However,
it is still useful to use containers for deployment and management, so we create a simpler bootstrap daemon to achieve this.
Versions supported
v1.2.x and v1.3.x are supported versions for this deployment. v1.3.0 alphas and betas might work, but be sure you know what you’re doing if you’re trying them out.
Multi-arch solution
Yeah, it’s true. You may run this deployment setup seamlessly on amd64, arm, arm64 and ppc64le hosts.
See this tracking issue for more details: https://github.com/kubernetes/kubernetes/issues/17981
v1.3.0 ships with support for amd64, arm and arm64. ppc64le isn’t supported, due to a bug in the Go runtime, hyperkube (only!) isn’t built for the stable v1.3.0 release, and therefore this guide can’t run it. But you may still run Kubernetes on ppc64le via custom deployments.
hyperkube was pushed for ppc64le at versions v1.3.0-alpha.3 and v1.3.0-alpha.4, feel free to try them out, but there might be some unexpected bugs.
Options/configuration
The scripts will output something like this when starting:
+++ [0611 12:50:12] K8S_VERSION is set to: v1.3.0
+++ [0611 12:50:12] ETCD_VERSION is set to: 2.2.5
+++ [0611 12:50:12] FLANNEL_VERSION is set to: 0.5.5
+++ [0611 12:50:12] FLANNEL_IPMASQ is set to: true
+++ [0611 12:50:12] FLANNEL_NETWORK is set to: 10.1.0.0/16
+++ [0611 12:50:12] FLANNEL_BACKEND is set to: udp
+++ [0611 12:50:12] RESTART_POLICY is set to: unless-stopped
+++ [0611 12:50:12] MASTER_IP is set to: 192.168.1.50
+++ [0611 12:50:12] ARCH is set to: amd64
+++ [0611 12:50:12] NET_INTERFACE is set to: eth0
Each of these options are overridable by exporting the values before running the script.
Setup the master node
The first step in the process is to initialize the master node.
Clone the kube-deploy repo, and run master.sh on the master machine with root:
$ git clone https://github.com/kubernetes/kube-deploy
$ cd kube-deploy/docker-multinode
$ ./master.sh
First, the bootstrap docker daemon is started, then etcd and flannel are started as containers in the bootstrap daemon.
Then, the main docker daemon is restarted, and this is an OS/distro-specific tasks, so if it doesn’t work for your distro, feel free to contribute!
Lastly, it launches kubelet in the main docker daemon, and the kubelet in turn launches the control plane (apiserver, controller-manager and scheduler) as static pods.
Adding a worker node
Once your master is up and running you can add one or more workers on different machines.
Clone the kube-deploy repo, and run worker.sh on the worker machine with root:
$ git clone https://github.com/kubernetes/kube-deploy
$ cd kube-deploy/docker-multinode
$ export MASTER_IP=${SOME_IP}
$ ./worker.sh
First, the bootstrap docker daemon is started, then flannel is started as a container in the bootstrap daemon, in order to set up the overlay network.
Then, the main docker daemon is restarted and lastly kubelet is launched as a container in the main docker daemon.
Addons
kube-dns and the dashboard are deployed automatically with v1.3.0
Deploy DNS manually for v1.2.x
Just specify the architecture, and deploy via these commands:
# Possible options: amd64, arm, arm64 and ppc64le
$ export ARCH=amd64

# If the kube-system namespace isn't already created, create it
$ kubectl get ns
$ kubectl create namespace kube-system

$ sed -e "s/ARCH/${ARCH}/g;" skydns.yaml | kubectl create -f -
Test if DNS works
Follow this link to check it out.
Create an Issue Edit this Page